Using European Power Plugs with Brazil's new type of Power sockets
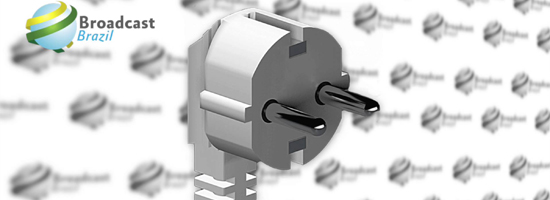
Using European Power Plugs with Brazil's new type of Power sockets
Using European Power Plugs (Type F connector Schuko) with Brazil's new and old type Power sockets. It will safe you a headache when you are on location.
video:
Like us if you want on Facebook, and follow us on Twitter and Subscribe to our YouTube channel.
Vector Graphics in Motion
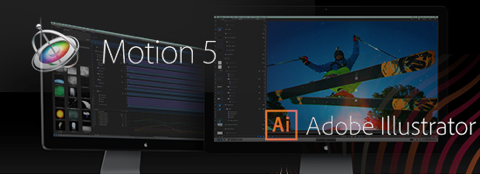
Using Scalable Vectors in Motion 5
In this Insights article we are gonna talk about a way to easily use your Vector based graphics in Motion 5 and being able to scale them, using these vectors as PDF files.
From basic to complex animations, a lead-in or lower-third, most editors use Motion5 for something, and of course create most graphics in 3rd party applications Like Illustrator.
Imagine exporting all your vector work as transparent PNG’s, and as big as possible keeping in mind you might want to resize them during the animation process.
For sure you will end up with blurry graphics and worse, a lot of headache and wasted time.
Saving you Vector Work
Besides the tutorial video here at the end of the article we are also showing you how to do this just by reading and following in Motion.
We start of by using our BroadcastBrazil Logo in Illustrator, already at the size we need.
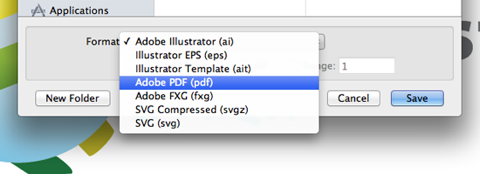
In Illustrator then select File → Save As
In the pop-up window select at Format: Adobe PDF
Click on Save and select the Preset [High Quality Print], and deselect the ‘Preserve Illustrator Editing Capabilities’ at the Options
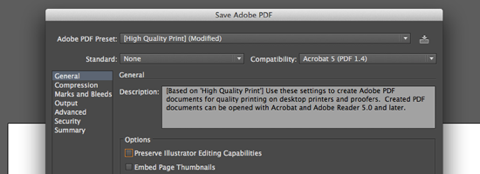
Note:You can also select other Presets but this gives us 100% the highest quality graphics
Diving into Motion5
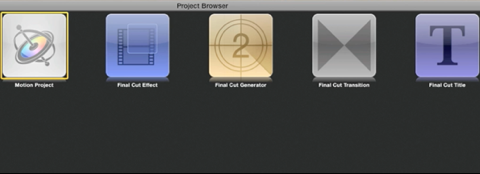
Let’s open up Motion 5 and select a new Motion Project in the Project Browser. We’ll set the duration to 5 seconds which is more the enough for what we will do.
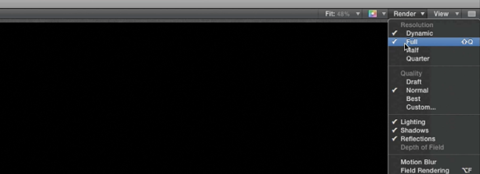
With our new project open, at the top right of the screen we set the Preview window to Fit, Resolution to Full and Quality to Best so we have a good quality view of our work.
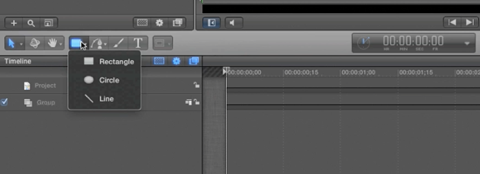
Let’s draw a white rectangle as our background, which works good for our logo
After this go to the Media tab and select the + sign to add the PDF file

Now make sure the PDF file is selected in the Media tab, all ready?
Select the Inspector top on the top left part and in that tab select the Media Tab.
Here you will see a checkbox for ‘Fixed Resolution’, uncheck it!
This makes sure you can scale the PDF file as much as you need, just like your vector artwork.

Note: Do you see the black around the BroadcastBrazil logo? This means it is transparent!
Vector work with no background and exported as PDF maintain their transparency in Motion.
Drag the DPF file in the project timeline and you are all set to go.
If you scale it up at the Properties Inspector to for example 4000% you can see it still looks sharp. This gives complete freedom in how you want to use a vector graphic without worrying about the quality when scaling it up.

So hopefully this is little trick as you can call it might help you out in your Motion animations, an easier workflow without limitations.
Imagine having 100 PDF files of 60kb instead of 100 PNG files of 1mb each, you do the math and see how this speeds up all processes.
Tutorial video:
Mentioned:
Motion5
Adobe Illustrator
Be sure to check us and Like us if you want on Facebook, follow us on Twitter and Subscribe to our YouTube channel.
Lot's of news, photo's and info for broadcasters, webcasters and mobile producers in Brazil.
by Niek van Esch
Convert FCP7 to FCPX
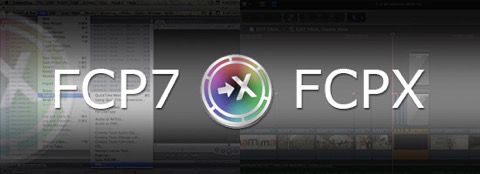
Converting Final Cut Pro 6 & 7 to Final Cut Pro X !
Hey there! So here we are with a new insights article.
Today we will show you a great piece of software for the Mac letting you convert your FCP7 projects to FCPX.
Since there were some serious problems in migrating projects to FCPX, Intelligent Assistance developed a program called ‘7 to X’.
We will show you how this programs works, the key features and a short tutorial video.
First of all, we install the program, which can be downloaded from the Mac App Store.
What does it require?
-Final Cut Pro version 10.0.6 or later
-An application that exports Final Cut Pro XML (such as Final Cut Pro 7 or 6, Premiere Pro CS6 etc.)
-OS X v10.9 Mavericks, v10.8 Mountain Lion, OS X v10.7 Lion or OS X v10.6 Snow Leopard
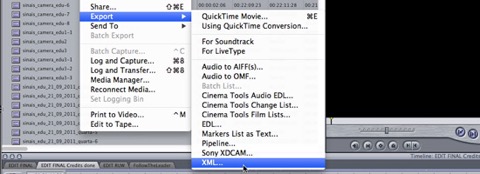
After installing the program you open your project into Final Cut Pro 7. Choose the File menu and from the Export submenu, select XML...
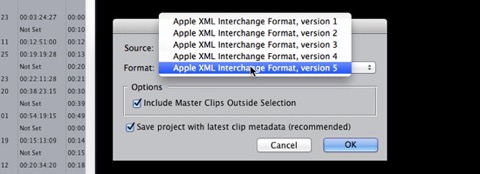
Choose Apple XML Interchange Format, version 5, then name and save the XML file.
Note: If you have Final Cut Pro X and Final Cut Pro 7 installed on different Macs or partitions, save the XML file to an external storage device.
So what if you still use FCP 6 or maybe Premiere Pro? These can also be converted to FCPX, but be sure to choose ‘Apple XML Interchange Format, version 4’ when doing this.
Run Final Cut Pro X and select in the Event Library where you want the new Event to be created.

To translate the project you have 3 options:
-run 7toX and use the open dialog to locate your exported XML file;
-drag-and-drop the XML file onto the 7toX application icon;
-right-click on the XML file in Finder and choose Open With > 7toX for Final Cut Pro from the contextual menu.
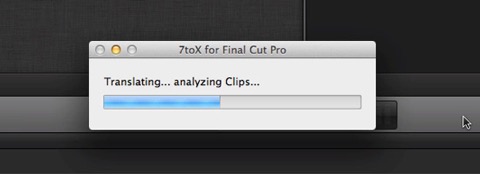
Note: be patient, depending on your project size this can take some minutes
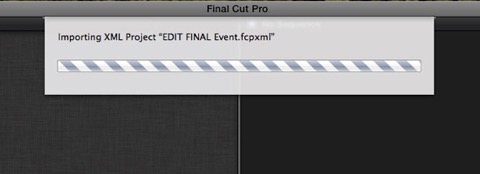
After Translating FCPX will import the XML file
As you can see there is a new Event created with the name of your XML file.
In here you find all your media and the sequence(s) which you can open in the timeline to edit, of course there is some rendering needed.
There are many options to enhance the translation from FCP 7 to FCPX, like changing the compound clips and connection points to updating your Motion files, all these options you can find on the website of Intelligent Assistance.
What is our “Opinion”
Any drawbacks? Of course not everything get’s translated because of the different ways these programs are build. Some transitions will not make it, text titles may change a little, keyframed speed changes will end up in a constant speed change and so on.
The project we used translated great, also our markers stayed where they were. A Project in ProRes 1080i from 2:15 minutes took just 3 minutes to convert.
So worth the buy? For sure! The people at Intelligent Assistance should be proud of doing something Apple wouldn’t/couldn’t do.
If you still work with FCP7 and want to start with FCPX this is a great way, but also if you have older projects needing some extra work and you are ready for FCPX this is simply a piece of software you need to have, and for only $ 9,99 this is for sure a bargain!
Tutorial video:
Here also some practical links
Intelligent Assistance
7toX in the App Store
But now the good stuff!
Intelligent Assistance was so kind to give us 2 free redeem codes for 7toX, head over to our Facebook page and see what you need to do to have a chance winning one of these!
Mentioned:
Intelligent Assistance
7toX
FCPX
Be sure to check us and Like us if you want on Facebook, follow us on Twitter and Subscribe to our YouTube channel.
Lot's of news, photo's and info for broadcasters, webcasters and mobile producers in Brazil.
by Niek van Esch
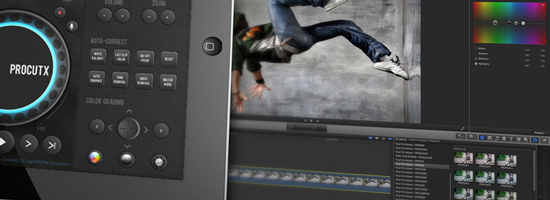
Control FCPX with your iPad!
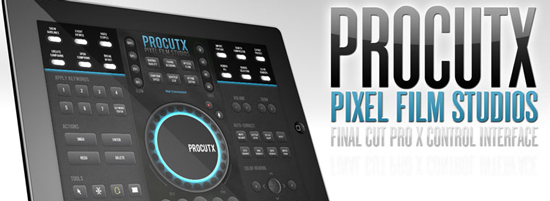
Control FCPX with your iPad !
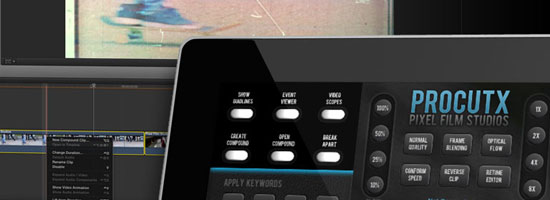
We are back for writing a review on mobile use in the broadcast world. Here at Insights we will test a new app for iPad to control Final Cut Pro X. PROCUTX for Final Cut Pro X is an iOS iPad application that allows editors to control Final Cut Pro X on their MAC through an iPad. Designed by Pixel Film Studios and created by LightWORK Solutions Inc
Note: Compatible with iPad. Requires iOS 5.1 or later.
Let’s start with some key features of the app, which include:
• Precision Timeline Scrubbing
• Quick Retiming
• Auto-Correct Color
• Color Grading
• Compound Clip Editing
• Import, Export, and Rendering shortcuts
• Quick Keywording
• Fast access to Tools
• System Volume Control
• Timeline Zooming
• Audio Enhancements
• Record Voiceovers
It has been build to meet the needs of today’s creative editors and breaks free from the idea of menus, tabs and shortcut keys to better streamline the tasks of the editor.
First thing we need to do now is install the Software on our Mac to communicate with the iPad. When you open the ProCutX app it will let you fill in your e-mail to send the installation instructions.
You can also download the installer for OSX 10.7 (Lion) and OSX10.8 (Mountain Lion) here. If you're running OSX 10.6 (Snow Leopard) , support is still experimental, although we are testing it on 10.6 just to see how it goes.
You can download the 10.6 file here. Open the disk image you downloaded and find the "ProCutX Keyboard Set.commandset" file. We'll be importing this into Final Cut Pro X.
Open Final Cut Pro X and choose the Final Cut Pro menu → Commands → Import. Choose the ProCutX Keyboard Set and import it.
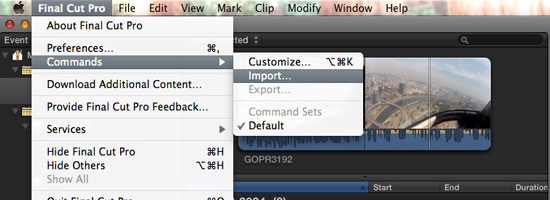
FInally, choose the Final Cut Pro menu → Commands menu and ensure the "ProCutX Keyboard Set" is active.
Now select the ProCutX Server.pkg in the disk image you downloaded and follow the instructions. You can start it in you System Preferences now.
Important: Your Mac and your iPad must be connected to the same network.
Trick: We realized that sometimes ProCutX can’t find the network, in that case just switch it off and again on in system preferences and you’re good to go.
Let’s go to the iPad and open ProCutX, you should see a list of available computers with your Mac listed. Go on and select it and you are “Ready To Go!”
Note: If you don't see the connection screen tap the connection status text in the center.
We tested the app and also made a small video controlling everything using the ‘internet sharing’ option on the iMac and having the iPad connected to it.
It makes the connection faster and more stable.
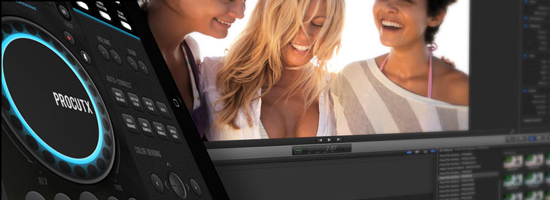
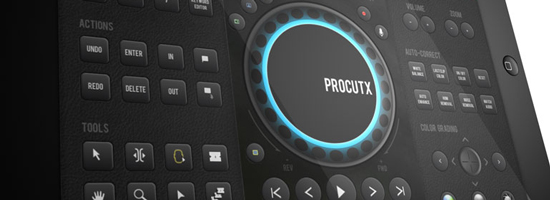
ProCutX: So what can we do with it exactly?
Timeline Scrubbing
The main dial in the center of the app let’s us scan the magnetic timeline in the project by simple dragging our finger around the wheel. By moving your finger around the precision dial you can simply move the playhead frame-by-frame. Their are also buttons that allow moving forwards and backwards to the cut points in the clips. These buttons also work in the Event Library and where we view our clips, pretty handy and it speeds up the process of adding for example Keywords.
Note: The little button with the ‘square’ symbol in it selects the clip you are currently hovering in your project!
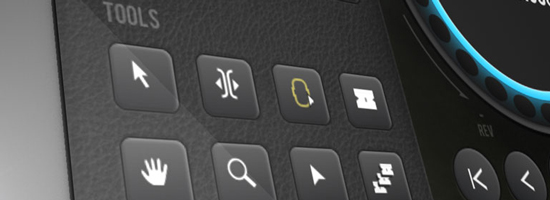
Controlling the Editing Tools
There is a toolbox on the bottom left of the app, you can make your edits using these buttons. A handy one is the Blade All tool, the one on the right bottom side, this cuts all the clips (video & audio) that are layered on top of each other at once. But one of the problems with some of these functions is that you may be able to select a tool like Range Selection or Trim, you can’t apply it to a clip. we still needed to drag the mouse over the clip to select it. Of course this still is a time saving feature, having your main editing tools all in front of you, it sure speeds things up.
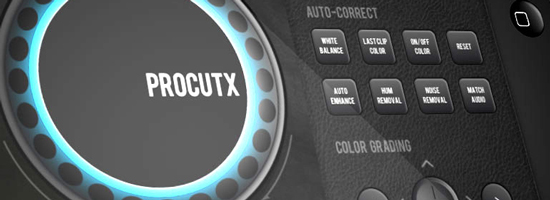
Color Grading
Maybe one of the most practical things when finalizing your video, controlling the Color Board’s exposure, saturation and color using the ‘directional’ pad in the bottom right of the app. Although it works rather nice, the Color Grading section is quite small, in our opinion it deserves a bigger space or maybe even a separate screen. Also, a Reset button would be practical to start from scratch when you messed things up.
One Tap Auto-Correction
If you are a big user of the auto-correct functions, you can now simple leave the Inspector behind you and auto-correct the clip’s white balance, color and noise removal. This works great and saves a lot of time, of course if you like to fine-tune your audio, as many editors do, you still need to get your mouse going.
Clip Compound
With the Compound Clip controls, you can group a complex set of elements and collapse them into a single clip just by tapping the button in the top-left corner of the app interface. You can then open or break them apart later with the other designated buttons.
Streamline Import & Export
Import, Export, Render...... all possible with designated buttons in the app, it gets the job done fast and easy, just simply pushing a button in the app.

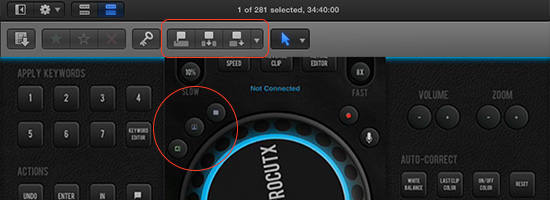
Other Functions
There is a lot more in the app then you will see at first sight, some buttons took even some time to figure out. On the left top side of the interface dial you see three buttons, these let you pick between the ‘video and audio’, ‘video only’ or ‘audio only’ options of Inserting video and connecting or appending the video file to the story line. See the picture below for a visual.
Keywords are great to better organize all our clips, with a simple click you can open the editor or simply apply shortcuts with the buttons number 1-7.
Note: Only remark here is that there are 9 shortcut keys in FCPX and we have 7 on screen.
Volume and Zoom, two very simple but extremely useful functions, as well as the Actions section.
What we really love? The option to toggle the Audio Recorder on and off, and even start and stop the recording, that is a feature!
What is our “Opinion”
ProCutX, it comes with a great proposition and a very clean designed interface. Most of the functions will certainly speed up the workflow although some important ones are missing. For example it would be great to have the Scroll Wheel connected to the Tools. Need to move an audio track just a few frames? Imagine toggling the Select Tool and use the Scroll Wheel to reposition the audio track. This is probably one of the most important things to have in a future update. It may take some time to get used to all the options, being that they are crammed into a small space, which can be confusing to look at the first times you use it. Is it replacement for the mouse and keyboard? It isn’t and also can’t be.... simply because we can use the mouse and keyboard by feel while keeping our eyes on the visuals. But..... having this app as an add-on is great and makes your workflow much faster! Even if you are thinking of using just a few of the options in this app, it is worth the buy, and of course, many updates are planned being it is a new app. ProCutX shows a lot of potential and promise!
Tutorial video:
Watch more on our video's page!
UPDATE 27 of May 2013:
New in Version 1.1.2
ProCutX is now a Universal App! Access the most useful ProCutX tools at the touch of a finger on your iPhone.
Here also some practical links:
Pixel Film Studios
Lightwork Solutions Inc
ProCutX in the App Store
.... Surprise!! .....
We got a great deal from the guys over at Pixel Film Studios.
They are a well known company when it comes to making FCPX Effects and Transistions.
You now have until the 26th of march 2013 the chance to buy these Effects, Transitions or even Bundles with a discount that Pixel FIlm Studios offered especially for our readers, you!
Just go to our Facebook page on facebook.com/BroadcastBrazil and search for our posts with the code in it!
It shouldn’t be hard to find it, we’ll be posting every day the code is valid.
And if you didn’t already, Like us and share the post and article to have your friends also enjoy the discount!
Mentioned:
Pixel Film Studios
Lightwork Solutions Inc
iPad
OSX
FCPX
ProCutX
Be sure to check us and Like us if you want on Facebook, follow us on Twitter and Subscribe to our YouTube channel.
Lot's of news, photo's and info for broadcasters, webcasters and mobile producers in Brazil.
by Niek van Esch
Lower Third Graphics
What, Why & How?
In this Insights article we are going to talk about the lower thirds, how to use them what not to do and even better, which software you can use to make them, including a short video tutorial about creating lower thirds in Adobe Photoshop.
In broadcasting, webcasting and video in general, the graphic at the bottom of the screen is called a lower third. The name suggests this graphic occupies the entire lower-third of the screen, but this is not (necessarily) the case.
Mostly lower thirds are used to identify the person speaking in the video.

Lower thirds are actually very versatile. Somehow most people relate them to News – but since they are versatile, they can be used in almost any type of video. Other uses of lower thirds include identifying the location or a time change in the story.
Now you might think, so what are exactly the 'rules' for these. Well, there are no specific rules or regulations for what a lower third should look like or what information it should contain. Instead, lower thirds should be used as support to the content of the video. When something needs to be explained, a lower third can do this without distracting the audience from the rest of the video.
When it comes to actually making these lower thirds there are some important things to keep in mind, which we will talk about now.
It may look quite simple, but they are pretty tricky things to build.
A ground-rule you can use is 'less is more'.
Often you will see "text only" graphics, even in big productions, this has a reason. Is your objective to only inform, plain text is a thing you can consider.
The best fonts to use are in general "Sans Serif" or have subtle edges. Text with small curved/ornate parts tend to flicker on screen.
Don't forget to stay far from thin fonts, those for sure will flicker to on screen.
The font Helvetica, often use by graphic designers, works great on video.
Also, the color should accompany the theme of the video, although a good option always is a white font with a drop shadow, this pops out nicely for readability
Note: Sans Serif means without Serifs, those tabs that hang on the points of some fonts

If you want to get more creative with lower thirds, start with adding a background image. Start simple with a solid color that is complimentary of the text. For web videos, a solid background is perfect because they're easily compressed and won't get blocky when played back. The background can extend beyond the viewable area of the screen as long as it stays on the lower third.
Note: Too many times you see crazy filled up graphics with loads of colors and what not more,
before you go completely loose always keep in mind that it is merely an extra to inform about what is happening in the video, not to take the full attention from the actual subject.
3D graphics and animation
Another great thing is using animation/motion in your lower thirds, these animations you can create inside your video editing program, or in animation software like Motion from Apple or After Effects from Adobe.
Motion is software that has a lot of good templates for you to start with, they are also editable so even with few knowledge you can get some great animation going.
If you are a FCP (Final Cut Pro) editor, it gets even easier, FCP has a content library featuring titles, transitions, effects, and generators, most of which are Smart Motion Templates. You can open any of these templates in Motion and customize them, then publish your modified template to FCP by saving it. The new template then is available for immediate use.
For everything it offers Apple's Motion is also pretty cheap, costing just $49,99
www.apple.com/finalcutpro/motion/

The nice thing about using these 3D animation packages is that you can be even more creative and create an extra dimension that, depending on the subject, can add an extra to the total experience.
When preparing the graphics for lower thirds you always need to keep the Safe section in mind. So what does this mean?
Well, if you would place your text to close to the sides it can be that it will be cut off on screen due to an amount of circumstances, as simple as people watching on a tv with a different format.
Almost every graphics program, like Photoshop, Illustrator and also Motion and AE (After Effects) have empty templates to start with. These mostly have the safe lines already in there, as you will see in the Video Tutorial.

So even without any knowledge about graphics and lower thirds it nowadays gets easier and easier to create great additions to your video production, or even webcast.
Hopefully this gives a better idea about the Lower Thirds, and feel free to aks any questions or give us your opinion about the article.
Tutorial video:
Watch more on our video's page!
Be sure to check us and Like us if you want on Facebook, follow us on Twitter and Subscribe to our YouTube channel.
Lot's of news, photo's and info for broadcasters, webcasters and mobile producers in Brazil.
by Niek van Esch